Tuesday, August 25, 2015

Control. Control! You must learn control! - Yoda

Anger, aggression....the Dark Side are they.....


Felt in the Force a disturbance, did I.  I went outside this balmy, cool 80 degree morning, which is downright pleasant by Las Vegas standards, to carry out my daily morning ritual of enjoying our garden and making sure that nothing needed special attention.  Every day, I check the soil for adequate moisture, the mulch and soaker hoses to see if they need re-arranged (our neighborhood cats love to redecorate the yard at night) and the plants to see if they are reasonably healthy depending on the species and where they are in their life cycle. 


Usually, when I examine our surprise pumpkin vine, I notice a little insect damage, heat stress and general aging of the older parts of the vine and think little of it.  It's what one can expect when a plant of this type is nearing the end of its life cycle and is starting to focus on fruit production.  It is still getting a few new leaves and flowers, but they are fewer and farther between.  I had long ago learned that plants do not have to look 'Better Homes and Gardens' Coverplant perfect in order to be pleasing....or so I thought. 

For some reason this morning, the insect damage on the pumpkin seemed so much worse than before. Bad enough, in my eyes, to jeopardize the nearly ripe pumpkin featured in my previous blog post. 

The oldest leaves are being eaten alive!


All I could see in that moment was the damage and ooh! I had to find the culprits and make them pay! 


There they are!


But what were they?  Even in my fit of righteous indignation, I still had the presence of mind to go to my trusty home-built computer and look it up.  According to University of California - Davis' Integrated Pest Management website (a great resource, be sure to bookmark it!) A list of critters that love pumpkin as much as we humans do 
 

This miscreant was a Squash Bug (Not the most inspired name, but it'll do) AKA Anasa tristis.  To quote the site they are

"0.63 inch long, grayish or yellowish brown, flat-backed, and somewhat speckled, often with a dense covering of black hairs. Edges of the abdomen are orange or orange and brown striped. Nymphs are pale green to almost white."

A moment of translation may be in order.  the 'abdomen' is the last segment of an insect, that is, the South end of a Northbound bug.  'Nymphs' in this case are not fairy tale creatures, but rather the younger versions of an insect. In some species, the nymph stage looks noticeably different from the adult stage other than just being smaller.  Knowing what the young look like can help you spot an infestation sooner than waiting for adults to show up before you can recognize the critter. 

That was what I was seeing alright.  To confirm, they had a lovely little mug shot of some adult versions along with another shot of the wilty result of the damage they cause as they suck your plants' leaves dry.


Leaves on the left starting to wilt from damage. Note also the grayish nymphs taking a break from wreaking havoc on these leaves.
So, now I knew who my nemesis was, but what to do about him? UC-Davis' IPM page doesn't have anything very comforting to say for this momentarily impatient gardener:

"  In spring, search for squash bugs hidden under debris, near buildings and in perennial plants in the garden. Inspect young plants daily for signs of egg masses, mating adults, or wilting. Place wooden boards throughout the garden and check under them every morning, then destroy any squash bugs found...."


"Squash bugs are difficult to kill using insecticides because egg masses, nymphs, and bugs are often hidden near the crown of the plant and difficult to reach with sprays.

"Several insecticides are available that are less toxic (note it does not say harmless) to the environment including products containing soaps and oils such as neem oil, horticultural oil, and canola oil. These soaps and oils are most effective on the smallest nymphs, but good penetration throughout the canopy is essential so that nymphs under the leaves and deep within plants will be covered. Other more toxic pesticides are also registered for use on squash bugs; however, these materials should be used with caution because of negative impacts on bees and beneficial insects such as predators and parasites that help to keep other pest insects and mites in check. In addition, they are not likely to give better control than handpicking combined with softer chemicals. "
So, at this point where I had let so many of the Squash Bugs become adults and so much damage was already done, it was too late to waste my time and money on such things as Neem oil and insecticidal soaps since those, and even the 'harder chemicals' only work on the nymphs and only when you can get to the bottom side of every leaf and bit of debris in the garden.  The shade cloth, logs and soaker hose that I had placed in my raised bed earlier this Summer to create a cooler, moister microclimate so that the little pumpkin and other plants could survive the dry heat was now working against me!  Oh well, that's how it goes. 

That leaves just 'hand picked' and that's what I ran back out to the garden to start doing with abandon!  
EVEN RESORTING TO FENCING PLIERS ON SOME OF THEM!  THEY DON'T BITE PEOPLE, BUT THE BIGGER ONES LOOK LIKE THEY COULD.  
 

I wetted down the entire raised bed of  plants with water (I'm fresh out of canola oil as I rarely fry anything) to flush the bugs out from hiding and started squishing! It's not for the squeamish as green goo gushed forth from them each time I smashed one.  Sometimes, I folded them up in the leaf they were on and squeezed the whole thing, other times I used my bare hands.  On the bigger, nastier looking ones, I resorted to using my handy dandy fencing pliers that my mentor at the NRCS gave me years ago, saying "If you have a pair of these along with what you've learned, you are equipped to do a lot of our work." 

 When I couldn't find anymore that I could catch (they are adept at crawling out of the way and at falling off their perch when you aren't fast enough).  I took a break....then realized that what I was doing was wrong.  Not only was it futile, since I couldn't possibly find every Squash Bug, nor especially ever find all of their tiny eggs, but also because the vine was just about done doing its duty anyway.  It has almost completely ripened the only pumpkin that is likely to survive the dry heat of my yard (others had started, but had shriveled up right on the vine from the heat), so what's the point of postponing the inevitable? 

Even if the Squash Bugs had never shown up, the vine would eventually shrivel up when the cold Autumn winds froze it anyway.  Moreover, the pulp in this pumpkin that I'm so worried about is destined to wind up in a pie.  The rest is destined to first be a jack-o-lantern, and then to be mulch for the seeds inside it....provided that it survives long enough to be picked.  Either way, it's going to die and turn back into the nutrients from whence it came eventually.

"Death is a natural part of life.....Rejoice for those around you who transform into the Force. Mourn them do not, miss them do not" - Yoda 


If I am going to commit to being an 'organic' and 'Earth friendly' gardener, shouldn't I be much more careful about how I attempt to exercise the powers at my disposal?  Sure, I could spray the whole raised bed with pesticides ('organic' or not) and try to wipe them out...all of them.  But there's no guarantee that I'd actually get all of them. In the meantime, I would be risking poisoning the very fruits that I hope to someday eat from the plants.  I'd certainly be killing any beneficial insects that happen to prey on the bugs I'm so worried about for a living.  Even though my squishing tirade didn't kill all the Squash Bugs, if I do have any predatory insects in my bed, they'll have slimmer pickin's for a while.  They might even move on and leave my bed altogether if their prey population drops too much.

It would be easier to spray than to squish, but then if I spray my own vegetables for bugs, why bother growing them at all? Why not just buy them all from the store? All of those are sprayed too. Even the allegedly 'organic' ones are probably sprayed at least with Neem oil (which isn't totally benign either and even has warning labels) otherwise, how could they send so many lovely looking fruits and veggies to the store? They can't possibly be turning most of their crop into compost since picky customers won't buy insect or disease 'damaged' produce...can they? 


I could give into the Dark Side every morning and squish bugs until my hands were sticky with their fluids, but I'd still never get them all and I'd feel just as bad as I do when I pull 'weeds' from a bed.  Who am I to say whether this plant or that bug is 'bad' or 'doesn't belong'?  If we get carried away with pest control, are we really being 'green' or just being 'green-ish' when it suits our purposes? 

As Yoda says, we must learn control.  Control of our own egos, emotions and short shortsightedness.  Something to think about for me and for all of us.

The leaves on my pumpkin vine may not look so pristine anymore, but my pumpkin is still growing. So are the peppers on this neighboring plant in the foreground (which the experts tell me the Squash Bugs won't eat anyway, just hide in). That's what matters, right?
 

Monday, August 24, 2015

A Touch of Autumn in August

We've got a pumpkin ready for autumn decor! How'd this happen? Here's the story in reverse.
When I knew for sure this wasn't going to be a squash :)

Hey! Here's a fruit! Note the soaker hose. It's coiled throughout the raised bed for even watering.
It's Blooming! Aren't they pretty? I hear they are yummy too.
From a "Weed" in the flowerbed to this! Is it Summer Squash?
It all started out looking like this. This is another one popping up in another pot.

If all continues to go well (our pumpkin vine is facing challenges from aphids, leafcutters and etc. now, but that's the breaks when you garden organically.  We try to remove insect eggs and larvae by hand, but you can't get them all.), we'll have our own little pumpkin for a tiny jack-o-lantern!  Raising your own plants from seed is fun. Give it a try.  If you have, drop us a line below about how it went along with any questions you may have about growing plants from seed. 

Speaking of surprise plants, here's an update from my last post: the top ear of corn is starting to fill out and the silks are fully elongated.  It's like waiting for Christmas morning, the anticipation of seeing how well the cob has been pollinated.  Each plump kernel will be a female flower on the cob that was pollinated.

Tuesday, August 18, 2015

The Accidental Corn Farmer

This corn plant showed up volunteer!
The tassle has opened
One of two ears emerging

You just imagine my surprise when I came back from vacation this summer to find this growing in my raised bed!  I didn't even know that corn kernels had fallen into the bed, but at least one must have.  Now, we've got a corn plant growing in our little garden in Las Vegas.  This picture on top was taken three weeks ago.  Now, it has tassels on it (the male flowers) and the start of two ears (the female flowers)!  We may wind up with an ear or two of corn by fall.  It's been fun to watch this plant grow from a seedling to an almost mature plant over the course of a couple months.  Good thing I know what corn seedlings look like and didn't mistake it for some species of turf grass.  I didn't get a good picture of it when it was smaller but corn seedlings look like this next picture below that I found online. 


What adventures with surprise or volunteer plants have you had?


Thursday, August 13, 2015

Fun Plant of the Day: Gooseberries!

These goosberries are ready to eat!
gooseberries grow in brambles and are wild in some places
They grow thorny canes with distinctive leaves

They have tiny pinkish green flowers
 Gooseberries are members of the currant family and are widespread in Europe and parts of North America. There are two main strains of wild ones: Ribes hirtellum (which is native to America) and Ribes grossularia (from the Causcaus Mountains and Northern Africa). Most of what we buy today are hybrids of the two.  Where I grew up in Nebraska, many homesteads, or places where the pioneers settled, have brambles of gooseberries growing wild long after the inhabitants of the homestead have gone. 

The fruits are soft, slightly sweet when ripe and so juicy!  They are excellent in desserts of any kind, but are mostly used in pies, tarts and such. Most gooseberries are harvested while they are still green and then sugar or honey is added to the dessert to help cut their sharp tartness.  They can be more tart than cranberries when green but are still plump and juicy. When you can manage to find ones that have fully ripened and are purple in the late summer / early fall, they are even good right off the stem. 


Gooseberry anything is so hard to find in Las Vegas that I always look forward to looking for them when I visit my parent's ranch in Nebraska.  Once in a great while, DuPar's at the Golden Gate Casino has gooseberry pie, but that's the only place I've seen it.  If you've seen gooseberry desserts elsewhere in Las Vegas, let me know.  Another option is to buy canned or frozen gooseberries if you can find them and make your own dessert.  Here's one:

  • 4 cups gooseberries (fresh, frozen or canned can be used)*
  • 3/4 cup sugar (better yet, replace with 3/4 cup honey)*#
  • 1/4 all purpose flour (unbleached if you can get it)*
  • Pinch of salt
  • 1 tablespoon butter*
  • Pastry for double-crust pie (or already refrigerated pie crust) (Mom's 'secret' crust recipe adds cinnamon, nutmeg and a dash of sugar to the dough for a crust with actual flavor)

    *May need a bit more than this at altitudes above 3,500 ft as many of us in the Southwest are.

    #May need less of this if you can get actually ripe, purple berries

    Directions:
  • Stem and wash gooseberries. Put in large mixing bowl. Combine sugar/honey, flour and salt in a smaller mixing bowl.
  • Add sugar/honey mixture to berries, then toss gently to coat the fruit. (if you use canned berries you can skip this step as they are already in syrup)
  • Fill a pastry-lined nine-inch pie plate with the gooseberry mixture; dot with butter. Adjust top crust. Seal and flute the edge with a fork. Make four slits in top of crust. Baste the crust with a butter and salt wash for a really golden brown crust. Cover crust with foil if desired.
  • Bake at 375 degrees F for 20 minutes (possibly longer if you live at elevations above 3,500 feet)
  • Remove foil and bake another 25 minutes or until golden brown.
  • Cool on a wire rack. (Cover with a tea cloth since we are in a low humidity environment here in the Southwest)

    If you have any recipes for gooseberries, please share them below.

They grow great in Nebraska, and further Northeast because they have cold winters with mild summers.  They can be grown with great care in the Southwest, but do best in areas of high elevation if you don't want to have to tend to them too much.  Here in Las Vegas, I would have to grow them as houseplants so that I could provide the shade, humidity and water they need.  They may survive outside in dappled full shade if they are near a water feature such as a waterfall or fountain, but they would have to be in containers to provide the well-drained slightly acidic soils that they are used to.  It could be a bit like trying to raise ferns here.  I'm sorely tempted to try it though as I so love the fruit that gooseberry brambles produce.

I've heard from folks at the Nevada Cooperative Extension Office that blackberries and boysenberries can be grown in Southern Nevada with enough irrigation and shade, but they didn't have any information about gooseberries.  If I decide to try it, I'll keep you posted on what happens.


Friday, August 7, 2015

What is a Palm and How Do We Care For Them?

Unpruned but healthy Mexican Fan Palm Washingtonia robusta at Fullerton Arboretum, CA


Areas around the world with a Mediterranean climate such as The Middle East, Florida, The Caribbean Islands and even places in the American Southwest have both native and introduced species of palms that grow well.  Las Vegas and Palm Springs are especially well-known for having palm lined streets and palms in many landscapes.  These popular plants are often referred to as 'trees' but they don't really grow nor behave much like most of the trees we are familiar with.  What are they and how do we take care of them?  We're going to briefly discuss those two questions in this blog post. 

This information is based on personal experience as well as discussions with teachers at the College of Southern Nevada's Ornamental Horticulture Department and University Research Extension Service circulars from both The University of Nevada Reno and The University of Florida. The extension services of these and a few other universities have even more detailed information about palms than we are going to go into here.  We encourage you to look into it if you are interested in learning more.  We can also discuss these topics in depth in the comments section if you would like.


First, what is a palm really?  There are two families of plants that are commonly called 'palm trees': Palmae and Cycadaceae.  Most are in the Palmae family, but at least one commonly planted 'palm' in the Southwest is in the Cycadaceae: the Sago 'palm' Cycas revoluta.  


Female (in background) and Male (in foreground) Sago Palms (Cycas revoluta)

Both palms and cycads are dioecious meaning that there are separate plants in each species: one being female and the other male.  You have to have a male plant nearby for the wind to carry its pollen to the female plants if you want fertilized fruit.  Some species of palms have edible berries or dates as long as they come from fertilized flowers.  This is beneficial to landscape designers since if you don't want to deal with the fruits falling on the ground, you can plant a male of the species.  On the other hand, if the people who will be near the plant the most have hayfever, you can plant the female plant instead to reduce the pollen count around the property.  Most of these plants do not flower until they are several years old, the exact age varying among species and depending on the health of the plant.  You can also prune off the flower stalks before they start dropping pollen or fruit without hurting the plant.  Removing flowers is harmless.  Removing leaves is harmful.  

Neither palms nor cycads are true trees.  They have significant differences in their anatomy and their behavior from what most real trees are like.  Palms are more closely related to grasses than to pines or deciduous trees and have anatomy somewhat similar to grasses although they are not anywhere near as tolerant of being pruned or cut as most grasses are.  Cycads are more closely related to pine trees in that they have a similar sort of flower structure as other gymnosperms (broadleaf plants that do not produce showy flowers).  Most trees will recover rather quickly from being pruned, even severely cut however palms and cycad species either recover extremely slowly or not at all depending on where the cuts happen. 

The most critical difference between palms and cycads versus most other plants we are familiar with is how they grow.  Both have their primary growing point at the very top of the plant.  If the buds at the top of the main stem are removed or killed (by frost, sun scald, pesticides, insect damage etc.) the plant will never recover from it and will be stunted at best, or begin to decline and die rather quickly at worst.  They cannot sprout at the base of their trunks as many trees can in response to damage.  They also lack true bark.  What some call the bark on these plants are just overlapping leaf bases and a porous material similar to what you see in the middle of a grass stem.  If this is damaged, it never scabs over and leaves wounds that make the plant more susceptible to insects and disease. 

Most species of palms also start very short and stay that way for many years as their trunk diameter gradually increases.  Once the trunk has reached the maximum diameter for the species (also depending on the plant's health), the trunk will begin to grow taller.  When the palm has reached its maximum height for its species (groups of palm species are capable of achieving different heights with species such as California Date Palm and Canary Island Date Palm being among the tallest at around 60 feet tall and pigmy palms such as
Phoenix roebelenii and Sago palms that only get about eight feet tall at the most), it will begin to age and decline, living less than 100 years in most cases.  The shortest species, tend to be multi-trunked and spread out more, so they need more square footage of clearance where they are planted. Trying to prune a multi-trunked species so that it looks single trunked is a huge mistake and will make the palm fall apart as it grows bigger.  Almost all palm species should have at the very least 10 to 20 feet of space or more between the mature sized trunk and traffic areas, power lines etc. to avoid having to prune them because they are 'in the way'.  Never plant a palm or cycad right up against any solid object such as a wall, fence, sidewalk etc. or you are asking for trouble later on. 

There are two main appearances of palms: 'Feather' and 'Fan'.  The feather types have leaves that look like a bird's feather since they are so deeply lobed that they appear to have hundreds of long, narrow 'leaves' growing out from the central axis of the leaf in a sort of herringbone pattern.  Fan palms look more like the palm of a persons hand or ceiling fan with wide leaves that appear to be almost completely entire with lobes of varying length (depending on the species) extending beyond the solid part almost like little fingers from a persons hand.  The solid part usually looks corrugated like a piece of tin or carboard.  All types of palms produce strong, stringy material from the leaf margins with the strings being longer or more abundant on some species than others.  California Fan Palm Washingtonia filifera, for example, has so many of these threads that it is how it got its name.


Fan Palm leaf style vs Feather style


California Fan Palm Washingtonia filifera with its threads

In general, the feather type palms tend to do better in full sun than the fan palms do here in the Southwest, so it does make a difference which type you plant in certain locations.  It especially matters what exact species you plant as some species get much bigger, height or width, than others. 

We
recommend Pygmy Phoenix roebelinii and Sago 'palms' for most residential purposes in Las Vegas as they don't get very tall and are easier to care for than the palms that get huge.  If you have the room and want a really hardy palm California Fan Palm Washingtonia filifera which is actually native to the Southwest and grows wild in oasis in the Sonoran and Mojave deserts.  The younger of a plant you get, the better it will survive the transplanting process and the healthier it may be later on.  It is sometimes easier to tell what sex the plant is once it is several years old. 

Palms should be planted in the late spring, after the last hard freeze, but way before temperatures start getting up into the 100's.  It is a myth that palms establish best when it is really hot.  They should be watered almost daily as they get established, but only need water occasionally once the root system has anchored in. When they are watered, it is important that they are irrigated long enough for water to moisten the soil down to the bottom of the rootball.  Light watering will leave them drought stressed.  However, that does not mean that they will tolerate saturated soil for long. They need to be planted in soil that drains quickly such as a fine sand or loamy sand.  They do best with irrigation water that soaks into the soil around the root zone of the trunk (from the trunk out several feet, depending on the species and age) rather than having water sprayed at them. In fact, our high pH water can actually cause salt damage to the trunks and leaves of palms when it is sprayed.  

Palms also need a lot of Potassium (K) and usually need it supplied by a low Nitrogen (N), low Phosphorous (P) but high Potassium fertilizer.  Over-supplying Nitrogen and Phosphorous runs the risk of polluting the ground water since the soil needs to be fast draining and over-fertilizing will not benefit the plant.  Potassium deficiency is the leading cause of most of the poor performance we see in palms.  Having leaves that droop, turn brown and 'need' pruned off (they never need pruned off as long as humans don't decide that they have to be) every year is a sure sign that the palm is lacking K and maybe other nutrients. It is also probably not getting enough water either. 

Most palm species have leaves that live three to five years at least, and as long as 10 years when the plant is really healthy.  Also, the 'dead' leaves are beneficial to the plant as they provide physical support to the younger leaves above them; protect the trunk from temperature extremes; and gradually release their nutrients back to the rest of the plant as long as they are still attached.  In fact, yearly pruning can lead to chronic K deficiencies that actually wind up causing even more rapid leaf drop and shortening the palm's lifespan. 

Some palm species hang on to their old leaves longer than others but all of them will shed the leaf when it is totally drained of mobile nutrients and has dried out completely.  Some shed dry leaves a few at a time over a very long time period, like evergreen trees do, while others will shed several all at once.  How clean you feel the area around your palm must be is something to consider when picking a palm species to plant.  If you are a neat freak or have others around you who dictate that nothing can stay on the ground, it's best to either not plant a palm at all, or to pick species that produce very little fruit, the smallest fruit, drop leaves less often and, if you can get them, the male of the species.  That species usually winds up being the Sago 'palm' as it has tiny berries, delicate leaves and drops them very seldom. 


Thursday, July 30, 2015


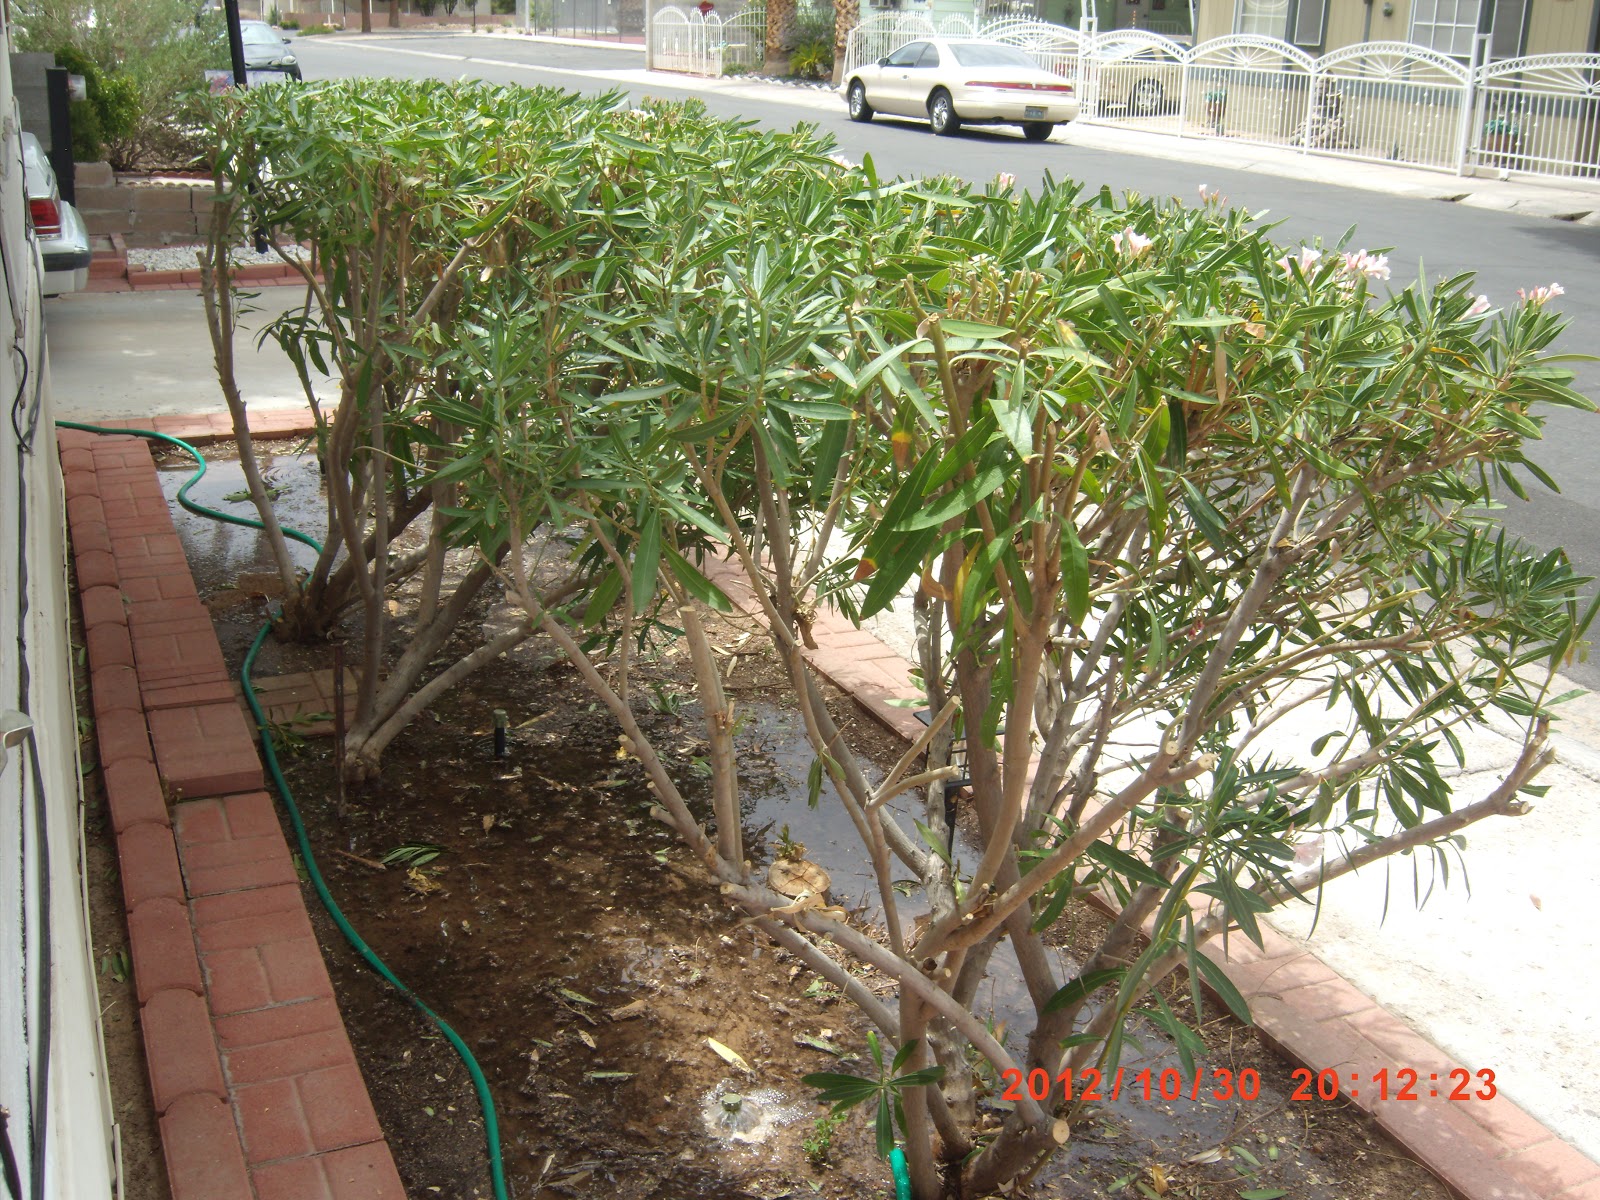
Oleanders pruned properly by yours truly


Same Oleanders pruned wrong by someone else


I've been pruning these Oleanders for several years.  This year, I wasn't available when the owner decided to have them pruned.  The person who they hired was asked to cut just a little bit off the top so it doesn't stick above the glass of the windows.  That person chose not to listen and did way too much.

Now, I will do my best to heal the Oleanders back up. It will take a long time.  Many species of shrubs wouldn't even recover from a severe cut like this. Oleanders are among the very few that can.   They will most likely start sprouting from the base before they begin to look like they used to be.  We will probably have to cover them with sheets on cold nights this winter to prevent frost damage. We may try planting Buffalograss underneath instead of Lantanas as the owner has now informed me that they don't want a lot of growth under the Oleanders.  Buffalograss will only get three inches tall or so out here.  

This is a good lesson to learn.  Be careful who you hire.  Make sure you find someone who actually knows what they are doing and will actually listen to you instead of doing whatever they usually do.  


Tuesday, July 7, 2015

Soak up the water around your property, don't make it run away!

This mulched bed has the start of a rain garden at the toe (or base) of the slope. We'll be planting small cacti and annual flowers into it this fall. This trench slopes towards the middle from both ends rather than towards the street.
Even though we don't get much rain in Southern Nevada, rarely more than two to three inches a year, we still get a lot of runoff and even some flooding when it does happen.  Also, irrigation leaks and activities such as washing your car at home and hand watering can lead to runoff if not done carefully. 

It's impractical and downright silly to demand that people stop using water outside and there is nothing we can do to stop cloud-bursts from dumping rain on us (why anyone would want to, I don't know since rainwater is the best irrigation one could hope for).  But we can make an effort to keep what water we do have on our properties and out of the storm sewers. 

The easiest solution is to reshape the landscape around your property.  You still want the soil to slope away from your buildings, but it can then slope towards the middle of a flower bed or lawn rather than towards the street.  It can usually be done by hand with shovels and maybe a pickaxe if needed.  One can dig a trench or a series of holes around the property. The deeper you dig them, the longer they will last before they need dug out again.  Always be sure to call your utility companies and whoever installed your irrigation system before you dig to make sure you don't wind up digging up a pipe or wiring! Then, slope the soil gently to direct the runoff towards the digging.  The bottom of the hole or trench is then lined with crushed rock to help maintain drainage.  Some people add geotextile fabric below the rock, but I've found it doesn't really help and just gets in the way when you need to re-dig the hole.  You can either fill the whole trench or hole with crushed rock or add layers of coarse sand or fine gravel on top of it. 

To make it even better, you can turn this into a rain garden and plant lovely flowers in and around the trench or hole.  Be sure to only use annuals or biennials (plants that live only two years).  Perennial plants will develop tough root systems that will make it really difficult to re-dig the trench later on. 

Others have done such a great job of diagramming and describing rain gardens in detail that I will leave a link below so that you can go to their page rather than trying to make my own.  Just be sure to ignore any advice on these pages that suggests planting perennial plants, trees and/or shrubs in or near your rain garden.    Low Impact Rain Garden Design Templates

 This article (in .pdf form) from the University of Nevada Reno does a good job of summarizing the many ways one can soak up rain, irrigation and spill water rather than letting it run off.  I couldn't really say it much better myself so I'll recommend it to you. Ways to make water soak into your property

This website is excellent in that it helps explain the difference between two terms that get used interchangeably but mean quite different constructions and that are often confused with rain gardens:  french drains and swales. These are both similar to a rain garden only they actually direct runoff away from the property, but at least slow it down first compared to just a smooth pipe running from a grate or a concrete trench.  This website is done by an association of certified home inspectors so their information is pretty reliable. May as well make your home and business construction pass inspection by design rather than having to re-do it later after it is inspected.  French drain inspections 

Finally, if you are considering installing or repairing the pavement in your driveway or sidewalks, here's a more environmentally friendly option to concrete that will also help keep water on your property rather than letting it run away. It's a vendor neutral article by a non profit organization so it's facts rather than hype.  Permeable Pavement

Not only are these permeable pavers and paving systems good for soaking up water, but they are actually easier to do compared to mixing and pouring concrete.  I've done enough laying of concrete to know that I'd rather not do it if I can help it. :)   

A rain garden can enhance the beauty of your property and help manage runoff at the same time.


Rain gardens can be established with or without a drain to the sewage system.  They are great to install around existing drainage systems to slow and sometimes even intercept the water before it gets to the drain.